Having trouble following the topic of discussion when someone throws out the words “Camarilla Equation” at your local trader happy hour? Relax. I’ve got a quick primer for you that will remove the cloak of secrecy from this fascinating price-based indicator.
Simply put, the Camarilla Equation is a price-based indicator that provides a series of support and resistance levels, much like the Floor Pivots indicator. However, what makes this indicator unique is the fact that each pivot carries a specific call to action. That is, this indicator is usually color-coded to indicate whether you should buy or sell at certain pivot points. We’ll get to this in a moment.
The equation takes the prior day’s high, low, and close prices to determine ten key levels on your charts; five support levels (L1 to L5) and five resistance levels (H1 to H5). The equation is as follows (keep in mind that RANGE is the high price minus the low price of the prior session):
H5 = (High/Low) × CloseH4 = Close + RANGE × 1.1/2H3 = Close + RANGE × 1.1/4H2 = Close + RANGE × 1.1/6H1 = Close + RANGE × 1.1/12L1 = Close – RANGE × 1.1/12L2 = Close – RANGE × 1.1/6L3 = Close – RANGE × 1.1/4L4 = Close – RANGE × 1.1/2L5 = Close – (H5 – Close)
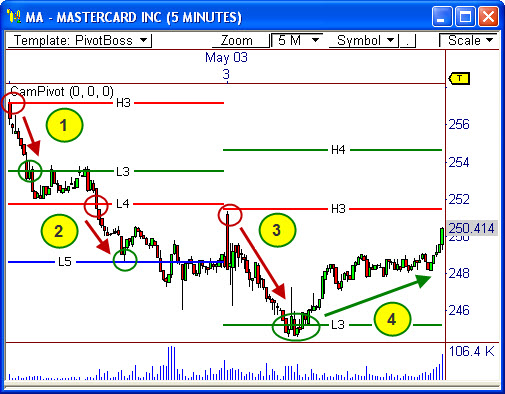
The Camarilla Equation offers a powerful method of trading the market because the call to action is always the same. The equation forces you to recruit your inner discipline to trade on the right side of probability. Traders take similar positions at each level, thus creating a powerful form of self-fulfilling prophecy. Moreover, the pivot levels in the indicator are usually color-coded to remind you which actions to take when certain pivot levels are tested. For example, the H3 and L4 pivot levels are typically colored red because these are the zones where you should be looking to sell the market. Likewise, H4 and L3 are typically colored green to indicate long action levels.
If you take action at the third layer of the indicator (ie: sell at H3, or buy at L3), your target then becomes the opposite pivot point. Therefore, if you sold at H3, then L3 becomes your target. If you bought at L3, then H3 becomes your target. In essence, the third layer of the indicator is usually reserved for reversal plays.
The fourth layer of the indicator (H4 and L4) is usually reserved for breakouts, although these levels can offer razor sharp reversal opportunities as well. If you play a bullish breakout through the green H4 level, then H5 becomes your target. If you play a bearish breakout through L4, then L5 becomes your target. Keep in mind that the fifth layer of the indicator can have varying formulas, depending on which version of the equation you find.
The first and second layers of the indicator (L1, L2, H1, and H2) are typically ignored and generally not even plotted. However, I will explain the best times to use these “hidden layers” in a future blog post.
Take at look at the 5-minute chart of MasterCard, Inc. (ticker: MA) for a brief diagram of the types of opportunities you can find using the Camarilla Equation.
Remember, this is a very basic look at the Camarilla Equation. Much like the other forms of price-based indicators I use, the Camarilla Equation lends itself perfectly for higher levels of analysis, like pivot width analysis, pivot trend analysis, and two-day pivot relationships. I’ll break these concepts down in future blog postings.
Now that the cloak has been removed, what do you think?
Frank Ochoa
PivotBoss.com
Follow Frank on Twitter: http://twitter.com/PivotBoss


Pingback: Is First Solar Ready for $140? | PivotBoss.com
Pingback: Chipotle Mexican Grill is Winding Up | PivotBoss.com
Pingback: 5 Reasons to Watch MasterCard Next Week | PivotBoss.com
Pingback: Has the Russell 2000 Found Support? | PivotBoss.com
Pingback: Buy $TPX and Sleep Tight | PivotBoss.com
Pingback: This Metal is Ready to Move | PivotBoss.com
Pingback: Analyzing the E-Mini Russell 2000 | PivotBoss.com
Pingback: $BIDU Headed to $75? | PivotBoss.com
Pingback: This Stock Could Move Big | PivotBoss.com
Pingback: Time to Buy Heating Oil? | PivotBoss.com
Hi Frank,
greetings from İstanbul,Turkey.I am a futures trader trading as a daytrader the turkish futures..I also use Camarilla equations in connection with floor pivots..I use the H2,H1,L1,L2 levels for realization only and H3,H4,L3,L4 for entries or realization for Camarilla…
In addition I created two target levels for longs and two for shorts,which I will share with you:
H6=H5 + (H4-H3)
H5= H4 +1.618*(H4-H3)
L5= L4- 1.618*(L3-L4)
L6= L5- (L3-L4)
in which the 1.618 is the Fibonacci golden ratio.
I got good results with these formula for exiting.I think various exiting levels can be created in similar ways.
Camarilla are good tools if one is accustomed to them and can use it with floor pivots.
I have also to congratulate you for the perfect prepared web site..
good trading….
Hi Frank,
Truly remarkable work, thank you x3.
I am puzzled by the Camarilla formulas though:
What exactly is meant by: H4 = Close + RANGE × 1.1/2 (I don’t get the 1.1/2 part… is that 1.2 divided by 2?)
Also: H5 = (High/Low) × Close (does this mean HIGH divided by LOW times CLOSE?)
The numbers I’m coming up with make no sense.
Thanks in advance…
Hank Dean
Your rather dense but loyal follower 🙂
Pingback: Watch the Dow for a Breakout | PivotBoss